
Reolink NVR allows you to record videos for Reolink IP cameras without using a computer. To achieve that, you need to add the camera to the NVR first. This article will guide you to add different models to a NVR across the following three product lines.
Applies to: All Reolink IP cameras and NVRs (new UI)
Please read this article first to understand the compatibility between cameras and NVRs: Introduction to Hardware Versions of Reolink NVRs
Reolink has optimized the NVR monitor interface to enhance the user experience, making it more intuitive and easier for customers to use. However, due to the time required for the update and the transitional phase, this optimization will be implemented on certain NVRs first. Therefore, this article distinguishes between two scenarios. Please determine your NVR hardware and firmware version to quickly jump to the relevant section.
RLN8-410 (N7MB01) & RLN16-410 (N6MB01) & NVS8 with Firmware v3.6
The following sections will cover how to physically connect the camera to the NVR and how to add the camera on the monitor.
1. Reolink Camera Connection Methods to NVR
Depending on the model, we divide the cameras into Reolink PoE cameras, Plug-in Wi-Fi cameras, and Battery-powered Wi-Fi cameras. Based on your camera type, select the corresponding section for the connection process.
-
Reolink PoE Cameras
Method 1: Direct Connection to PoE Port
Directly connect the camera to the PoE port of the Reolink NVR. In this case, the NVR will provide power to the camera.
Method 2: Connecting to the Same Router
Connect the camera to the same router that the Reolink NVR is connected to. In this scenario, additional power is needed for the camera, such as through a PoE switch or an adapter. Refer to specific instruction for this setup: How to Power on Reolink PoE Cameras. -
Reolink Plug-in Wi-Fi Cameras
A DC power adapter is required to power the camera.
Method 1: Connecting to the Same Router
Configure the camera and connect it to the same router that the Reolink NVR is connected to. Make sure the cameras you want to add to the NVR are connected to the same network (LAN) as the NVR. Otherwise, the cameras won’t be shown on the Add device list and cannot be automatically added to the NVR.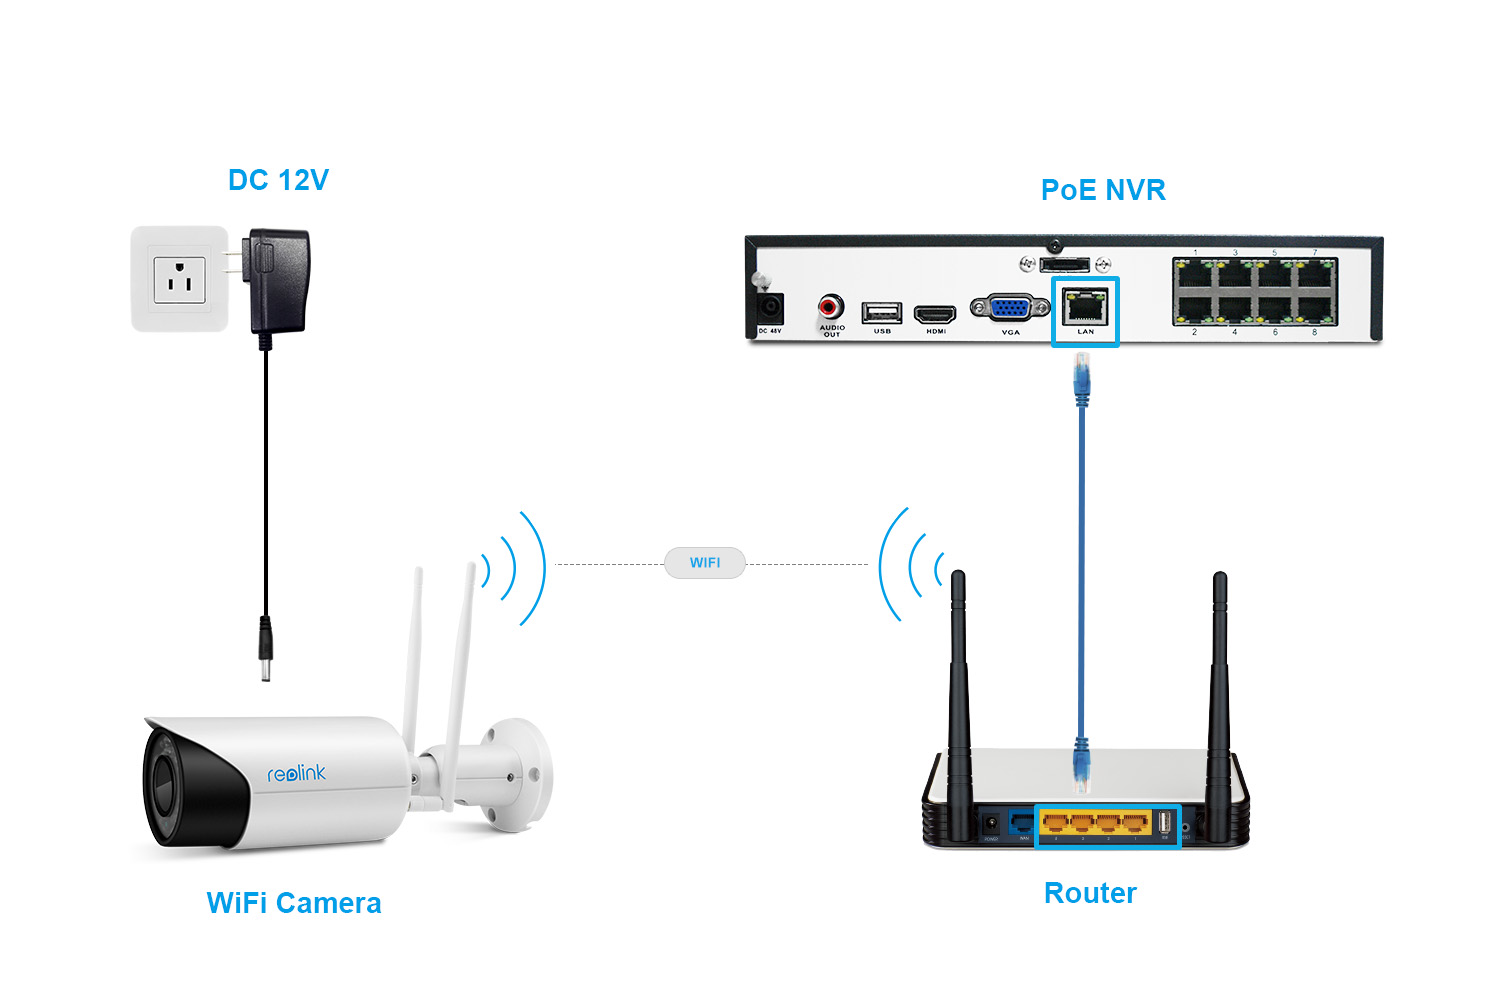
Method 2: Direct Connection to PoE Port
For Reolink Wi-Fi cameras with an Ethernet port, the camera can be directly connected to the PoE port of the NVR. Note that this method still requires a DC adapter to power the camera. -
Reolink Battery-Powered Wi-Fi Cameras
Ensure that the camera has power and it is turned on. Configure the camera and connect it to the same router that the Reolink NVR is connected to, refer to: How to Initially Set up Reolink Battery-powered WiFi Cameras via Reolink App.
Note: After the battery-powered Wi-Fi camera is added to the NVR, the NVR takes over, and the standalone access to this battery-powered Wi-Fi camera through the App/Client is no longer possible. If standalone access is needed, delete the camera from NVR.
2. Adding Reolink Cameras on the Reolink NVR
Adding cameras to the Reolink NVR can only be performed on the connected monitor. This monitor needs to be connected to the NVR using an HDMI or VGA cable.
Step 1: Adding a Camera via Preview Screen or Settings
Ensure there are available channels on the NVR for adding a new camera.
To add a camera, you can either:
Move your mouse to the empty channel space on the live view screen and click the "+" icon to add the camera.
Alternatively, go to Settings > Channel, find the empty channel space, and click the "+" icon to add the camera.
Step 2: Complete the Camera Addition in the Add Device Window
In the pop-up Add Device window, you will see two sections: Devices to Add and Added Devices.
Devices to Add represents the cameras that are detected and ready to be added to the NVR.
Added Devices shows cameras that have already been added to the NVR.
Select the camera from the Devices to Add section, click the "+", and then enter the camera's password to complete the addition. The default account name for the camera is admin (all lowercase). Note that for battery-powered cameras, there is no account name.
Other NVR Models/Versions
For other NVR models, including the RLN8-410 hardware version N7MB01 with firmware version v3.5 and earlier, follow the steps below to add a camera to the NVR:
-
Reolink PoE cameras with NVR
Ensure there are available channels on the NVR for adding a new camera.
There are two ways of connection:
A. Connect the PoE cameras to the NVR directly via an Ethernet cable. (suggested way for PoE camera, for RLN36 and RLN12W, they don't have capability to supply power for PoE cameras.)
B. Alternatively, you can power on this camera by a PoE switch/injector and connect to your router, then add this camera to the POE NVR system in the same local network.
The cabling for PoE NVR is shown below.
Here is a video for your reference:
-
Reolink WiFi cameras (plug-in) with NVR
You need to connect them in LAN, the connection diagram is as below. Make sure all the IP cameras you want to add to the NVR are connected to the same network (LAN) as the NVR. Otherwise, the cameras won’t be shown on the scanned list and cannot be automatically added to the NVR.
Here is a video for your reference to add the WiFi camera (plug-in) to the new UI NVR:
Step 1. Log in to your NVR, and go to Channel > Channel Management. Ensure there are available channels on the NVR for adding a new camera.
Step 2. Select Auto Add and all the cameras in the same LAN can be automatically shown on the list.
Step 3. If you have never changed the password of the IP cameras (the default password of the IP camera is blank) and there are enough channels for all the cameras, the camera will be added to NVR automatically.
Step 4. If there is no spare channel to display all the IP cameras or you have changed the login passwords of the IP cameras, you may need to go through a few more steps.
A. You may assign the IP cameras to any channel you want, but you cannot have two cameras on the same channel, or configurations would fail to be saved.
Select one of the cameras you want to add to this channel and click "Next" to add.
B. If you have changed the Username and the Password of your cameras, please find this camera displayed Incorrect account name and password then click Modify and use the soft keyboard to input the required information.
Step 5. Click OK to save and apply the configuration.
If your NVR is RLN12W, you can also refer to Method 1 in this article How to Add Reolink IP Cameras to Reolink WiFi NVR (New UI) to sync NVR's WiFi for your cameras.
-
Reolink Battery-powered WiFi cameras with NVR
Note: After the battery-powered WiFi camera is added to the NVR, the NVR takes over, and the standalone access to this battery-powered WiFi camera through the App/Client is no longer possible. If standalone access is needed, a hard reset of the camera is required.
Step 1. Initially set up battery-powered WiFi camera and make sure camera and NVR are connected to the same router: How to Initially Set up Reolink Battery-powered WiFi Cameras via Reolink App
Step 2. Ensure there are available channels on the NVR for adding a new camera. Under Live view, click the + button, and you will see camera is detected in the IP channel list. Choose the camera you want to add.
Step 3. Choose the camera and click Next. After adding to the NVR, you will need to re-configure your recording and detection alarm settings. Click OK.
Step 4. Input camera's password and click OK.
Step 5. Done! Now battery-powered WiFi camera is successfully added to the NVR.
If your NVR is RLN12W, you can also refer to Part 4. How to Change Camera's Wi-Fi in this article How to Add Reolink IP Cameras to Reolink WiFi NVR (New UI) to sync NVR's Wi-Fi for your cameras.