
Applies to: All Reolink products.
Error 5: Access denied is a known issue on Windows 10. This error prevents you from installing software on your computer and accessing or modifying certain files.
The reason for this issue is the availability of the permissions. Windows 10 will prevent you from installing if you don’t have the Administrator privileges or if your account is not the administrator account.
How to Fix Error 5 Access Denied?
Method 1: Fixing security permissions in the temp folder
- Press Windows Key once and click File Explorer
- Type
 in the address bar located in the middle top of File Explorer and press Enter
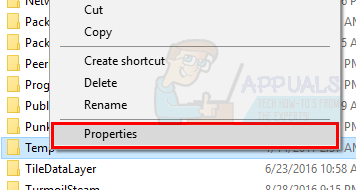
- Locate the Temp Folder and right click on it then select Properties
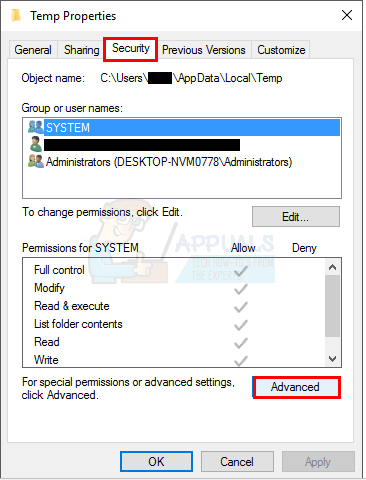
4. Click the Security tab and then click Advanced
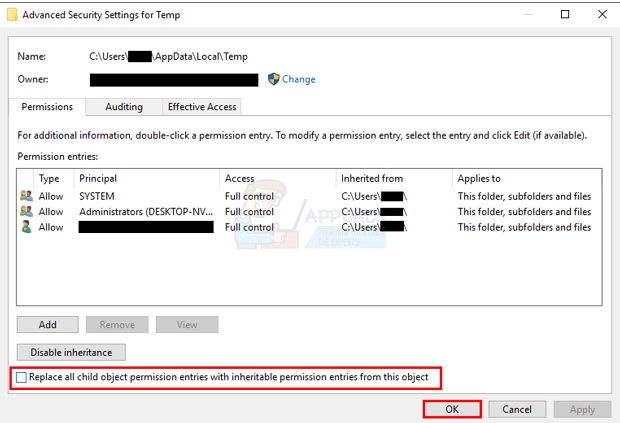
5. Check if Replace all child object permissions with inheritable permissions from this object is ticked. If it isn’t, then check it and click continue.
6. Now select any entry that isn’t inherited from C:\Users\[Username]\ folder and click Remove
7. Click Apply then click OK
Method 2: Get Administrator privileges
Make sure you have the Administrator privileges before trying to run the setup. To do that, right click on the setup that you are getting the issue on and select Run as Administrator.
Method 3: Make your profile Administrator
- Hold Windows Key and press R
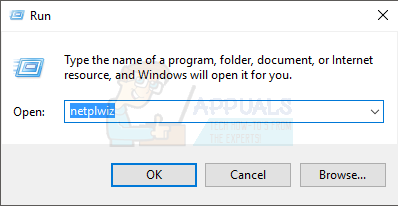
- Type netplwiz and press Enter
3. Select the user that you want to make the administrator of the PC
4. Click Properties

5. Click Group Membership tab
6. Click Administrator and click Apply. Then click OK

Method 4: Moving the installer
If you are getting the error on a specific installer then copy or move it to Drive C or whatever drive you have your Windows installed and then try to run it. It should fix the issue.
Method 5: Enable Built-in Administrator account
Basically, when you install Windows 10 then Windows create 2 extra accounts for you on its own. One of them is a guest account and the other one is an administrator account. Both of these are inactive by default.
You can check the account by performing the following steps
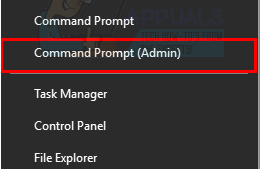
- Hold Windows Key and press X (release Windows Key). Click Command Prompt (Admin)
- Type net user and press Enter
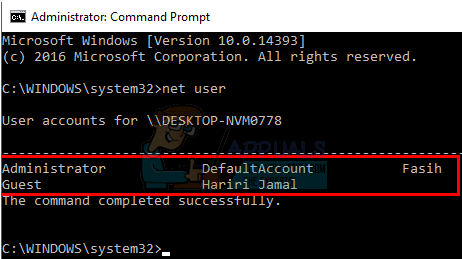
The main difference between your administrator account and the built-in administrator account is that the built-in administrator account has full unrestricted access to your computer. So, enabling the built-in administrator account can be helpful when you are having privileges problem on Windows 10.
These are the steps for enabling the built-in administrator account.
- Hold Windows Key and press X (release Windows Key). Click Command Prompt (Admin)
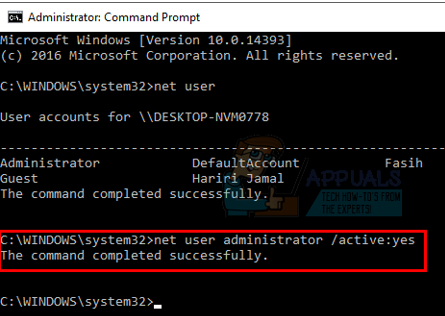
- Type net user administrator /active:yes and press Enter. You should see a message Command run successfully.
It’s always good to password protect your administrator accounts to prevent people from making changes in the PC.
- Type net user administrator <Password> and press Enter (you should write the password which you want to set for the administrator account in place of <Password>)
OR
- Type net user administrator * and press Enter. You will be asked twice to enter the password that you want to set for the administrator account. Just type your password and press Enter

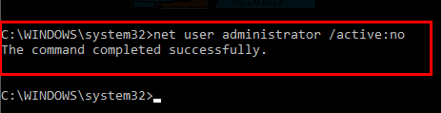
Now try to run the program and there shouldn’t be a problem. If you want to disable the administrator account then follow the below step
5. Hold Windows Key and press X (release Windows Key). Click Command Prompt (Admin)
6. Type net user administrator /active:no and press Enter.
For more, please kindly refer to the video:https://www.youtube.com/watch?v=L0LXu8OGUvg