
Reolink PoE NVR allows you to record videos for Reolink IP cameras without using a computer. To do that, you need to add the camera to the NVR first. The cabling for PoE NVR is shown below.
Applies to: PoE NVRs (old UI) with the hardware version H3MB02/H3MB16.
If your NVR is new UI, please check How to Add Reolink Cameras to Reolink NVR (New UI)
You may then follow the steps below to add Reolink cameras to Reolink PoE NVR.
Step 1. Connect your Reolink IP cameras to the Reolink PoE NVR. There're two different ways of powering your IP cameras:
- PoE cameras with PoE NVR
There are two ways of connection:
a. Connect the PoE cameras to the PoE NVR directly via an Ethernet cable. (suggested way)
b. Alternatively, you can power on this camera by a PoE switch/injector and connect to your router, then add this camera to the POE NVR system in the same local network.
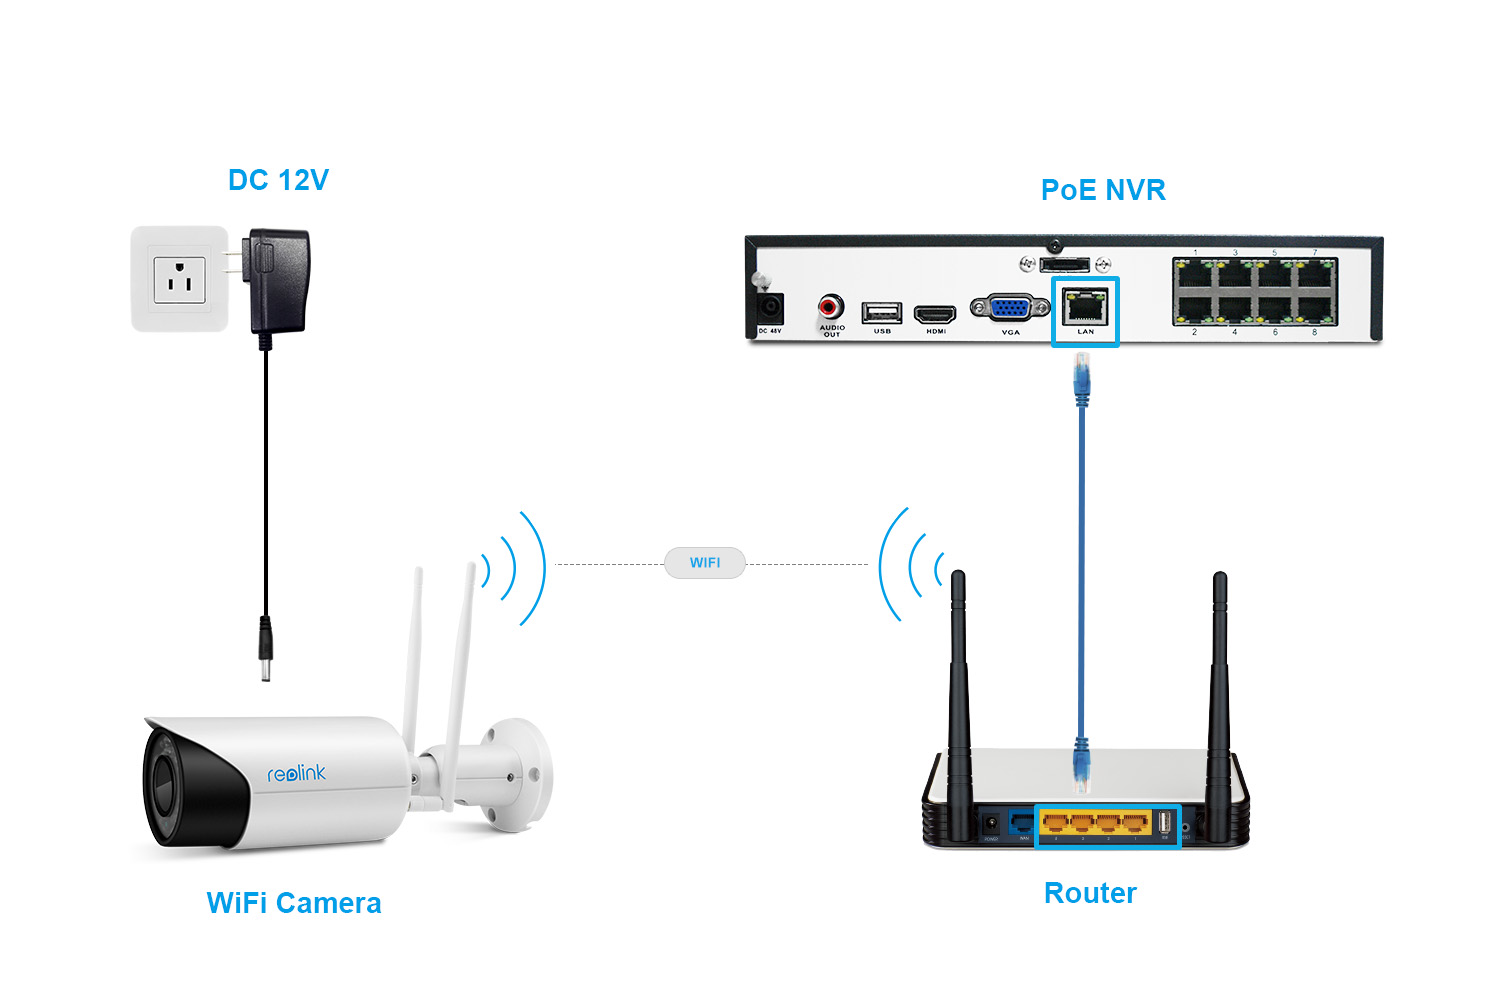
- WiFi cameras with PoE NVR
All Reolink WiFi cameras (except for battery-powered cameras) can be used with Reolink PoE NVRs, too. You need to connect them in LAN, the connection diagram is as below:
Note: Make sure all the IP cameras you want to add to the NVR are connected to the same network (LAN) as the NVR. Otherwise, the cameras won’t be shown on the scanned list and cannot be automatically added to the NVR.
Step 2. Log in to your NVR, and go to the IP channel.
Step 3. Select Auto Add, and click Scan so that all the cameras in the same LAN can be automatically shown on the list.
Note: The number of cameras that can be added to the NVR may vary depending on the NVR channel numbers of the NVR.
Step 4. If you have never changed the password of the IP cameras (the default password of the IP camera is blank) and there are enough channels for all the cameras, you may click Apply to add all the IP cameras to the NVR.
However, if you have changed the login passwords of the IP cameras or there is no spare channel to display all the IP cameras, you may need to go through a few more steps.
Step 5. If you have an 8-channel NVR and more than 8 IP cameras, please choose the 8 of them you want to add to the NVR and manually change the other cameras' Channel to None.
Note: You may assign the IP cameras to any channel you want, but you cannot have two cameras on the same channel, otherwise configurations would fail to be saved.
Step 6. If you have changed the User Name and the Password of your cameras, please drag the menu bar to the password column and use the soft keyboard to input the required information.
Step 7. Click Apply to save and apply the configuration.
Here is a video to show how to add WiFi cameras to PoE NVR:
Note:
RLN8-410 (with the hardware version H3MB02) and RLN16-410 (with the hardware version H3MB02 and H3MB16) don't work with 8MP cameras including B800/D800. The 4k cameras can only work with RLN8-410-E (with the hardware version H3MB16 and H3MB18) and RLN16-410 (with the hardware version H3MB18). And only the RLN8-410(H3MB18, N3MB01) and RLN16-410 (H3MB18) support the Human/Vehicle detection function.