
If you are interested in E1 Outdoor or already have ordered it, check out this article to see what you can get in the box and how to start using it.
Unboxing Video of E1 Outdoor
This video will show you what's in the box and take a quick look at the camera's features.
Product Overview
Here is detailed information about the camera's structure and components.
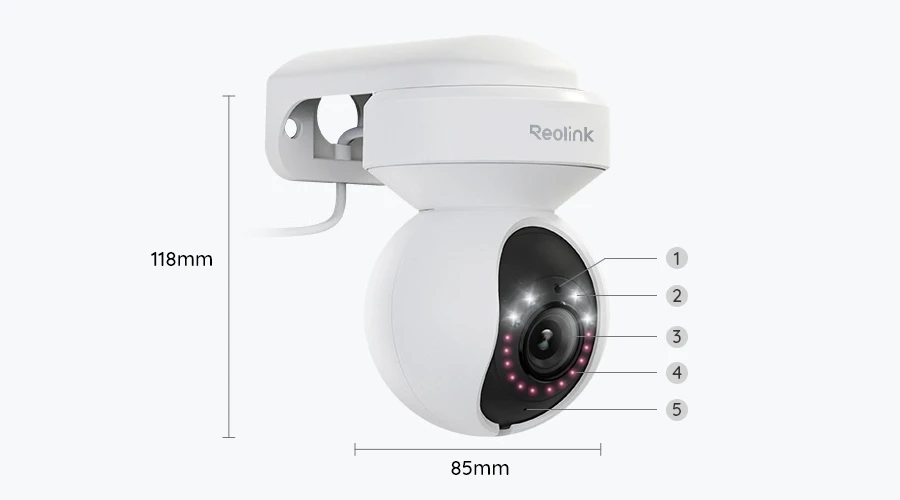
- Daylight Sensor
- 4 Spotlights
- Lens
- 12 IR LEDs
- Status LED
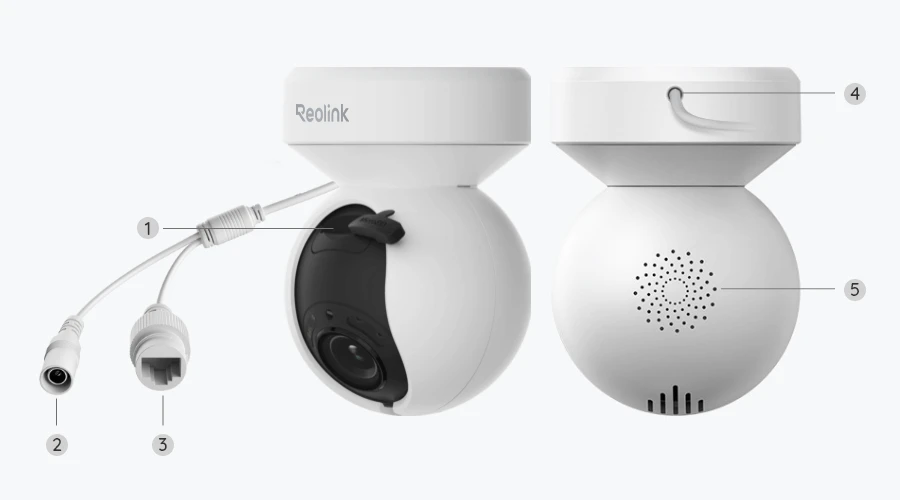
- Micro SD Card Slot
- Power
- Network
- Power Cable
- Speaker
Installation
Install the Camera
Step 1. Drilling two screw holes on the wall according to the mounting hole template.
Step 2. Insert the two plastic anchors into the holes on the wall.
Step 3. Secure the base unit in place by tightening the screws into the plastic anchors.
Step 4. Align the camera with the bracket, then turn the camera unit clockwise to lock it in position.
- Turn the camera anticlockwise to remove it from the wall.
- In case your camera is mounted upside down, the picture will need to be rotated as well. Please go to Device Settings >Display interface, then click Flip Vertical to adjust the image.
Install the SD Card
Step 1. Move up the lens to find the Micro SD card slot.
Step 2. Insert the Micro SD card into the card slot in the correct direction.
Note: Please use your fingernail or something sharp like the reset pin to push the Micro SD card in until you feel that it's locked or you hear a "click".
Initial Setup
To set up the camera, you need to switch on the camera and then finish the initial setup via both Reolink App and Client.
-
On Reolink App
Step 1. Switch on the camera and you will hear a repeated Ding sound or "Please run Reolink App, add the camera and set it up."
For more detailed instructions, you may refer to this article: How to Initially Set up WiFi Cameras via Reolink App (with Lan Port and Two-way Audio)Step 2. Tap on the icon
in the top right corner to start the initial setup.
Step 3. Scan the camera's QR code or manually type the UID.
Step 4. Select Wi-Fi Not configured. Please tick I have heard the voice prompt/ding sound, then tap Next.
Step 5. Enter the Wi-Fi password of the selected Wi-Fi network (you may tap the right eye icon to see and double-check the password) and tap Next.
Step 6. Use the camera to scan the QR code on the app, you will hear a different beep sound or "scan succeeded" voice prompt to notify your camera to read the QR code successfully.
Step 7. Hear the "connection to the router succeeded" voice prompt, which means your camera has been set up successfully.
-
On Reolink Client
Step 1. Switch on the camera and you will hear a repeated Ding sound or "Please run Reolink App, add the camera and set it up."
For more detailed instructions, you may refer to this article: How to Initially Set up WiFi Cameras via Reolink Client (with Lan Port and Two-way Audio) (New Client)Step 2. Tap on the Add icon in the top left corner to start the initial setup.
Step 3. Enter the UID of the camera, and then, click Add starting to set it up.
Step 4. Select Wi-Fi Not configured, then click OK.
Step 5. Input the WiFi information to configure WiFi for this camera. Please make sure that you enter the correct WiFi password.
Step 6. A QR code will be generated and displayed on the screen of your PC. Please place the camera in front of the QR code on your PC at a distance of about 20cm (8 inches) to let the camera scan the QR code.
Step 7. When you hear the voice prompt of scan succeeded, click Finish to wait. Hear the prompt of Connection to the router succeeded, you can create a password and edit the name for the camera. After that, the initial setup process is finished.